exploring Unreal
Hello and welcome! Just to give a brief description for this page, my goal is to use this as a database for myself (and anyone else interested) as I explore Unreal Engine from the UI tech side. These projects will consist of existing video games and possibly, personal UX/UI game projects that I wished to take further from an Adobe/Figma prototype to Unreal.  
*Disclaimer* I am an Unreal Engine novice so the methods I have taken may not show what the right method is. As I continue to learn more about the engine from an UI artists perspective, my methods will change. 
If you want to connect and chat about Unreal, feel free to message me via Twitter or LinkedIn
                   
Red Dead Redemption 2 | Pause Menu
UE 5.2.1 | March 21, 2024

RDR2 Pause Menu

My attempt at recreating in Unreal

Before starting with the obvious button displays and red "paint" graphic, I broke this up into three separate tasks. Each task containing sub-tasks. The order of these tasks was decided based on the order of appearance when the player presses the pause button in-game. 

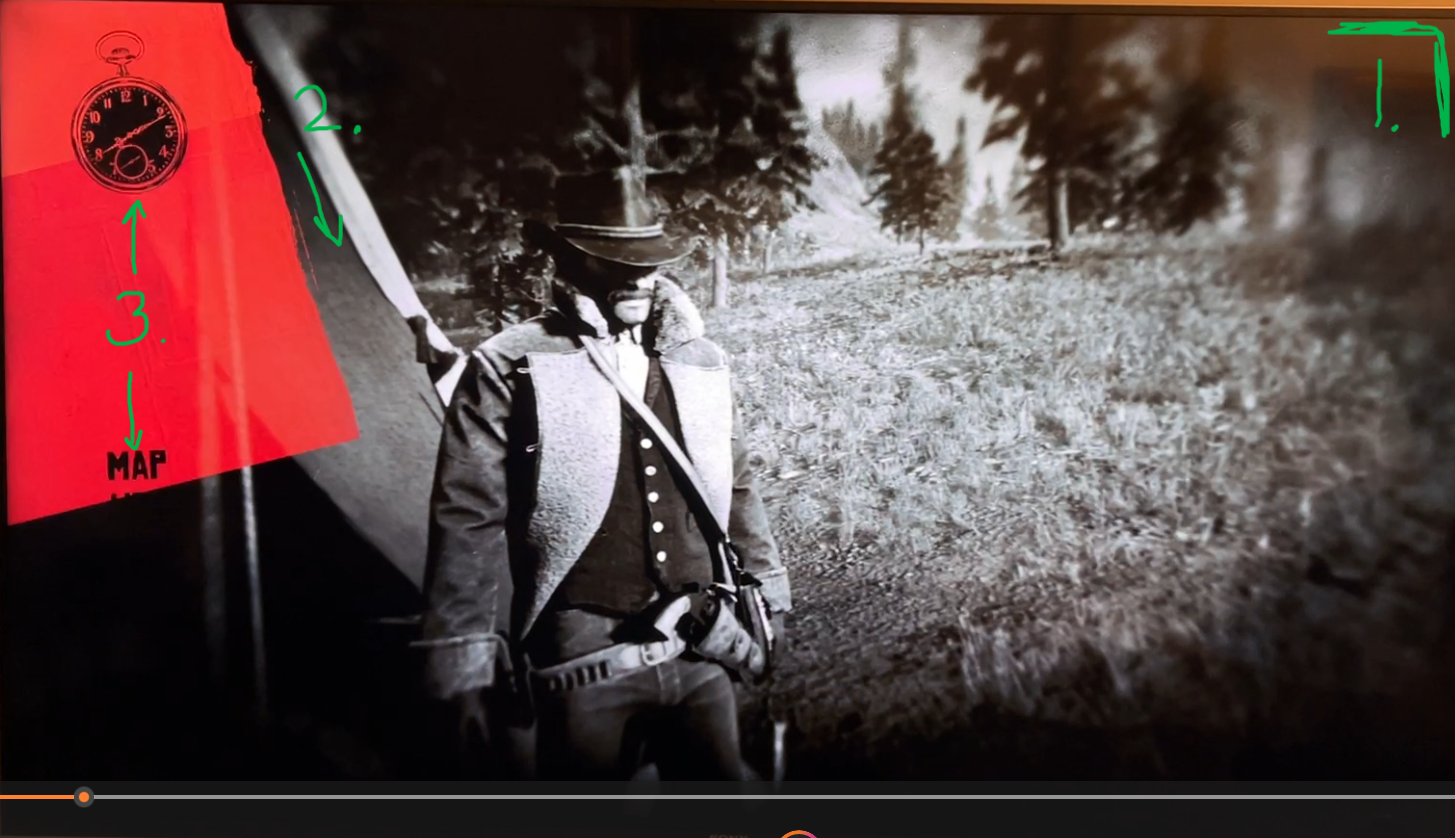
Breaking the process into layers

Task 1 | The Post Process Materials
The first task is an animation that mimics the exposure process of the daguerreotype, calotype, and tintype photo methods used during the early 20th century, the same time when the games story takes place. In game, the animation is a quick, one second transition from color to black and white, but within that one second transition, several sub-tasks were needed to achieve the right result:
1.a. — Desaturate
1.b. — Linear Dodge/Burn
1.c. — Vignette
1.d. — Scratch/smudge texture 
1.e. — Blur
Once I knew what was needed for this first task, I searched online for any relevant writing or video that could guide me in the right direction. Ultimately, I learned that this process could be created via a Post Process Material, creating a Collection Parameter for each sub-task, which would allow me to animate each one through a Timeline node inside the Third Person Character Blueprint. 

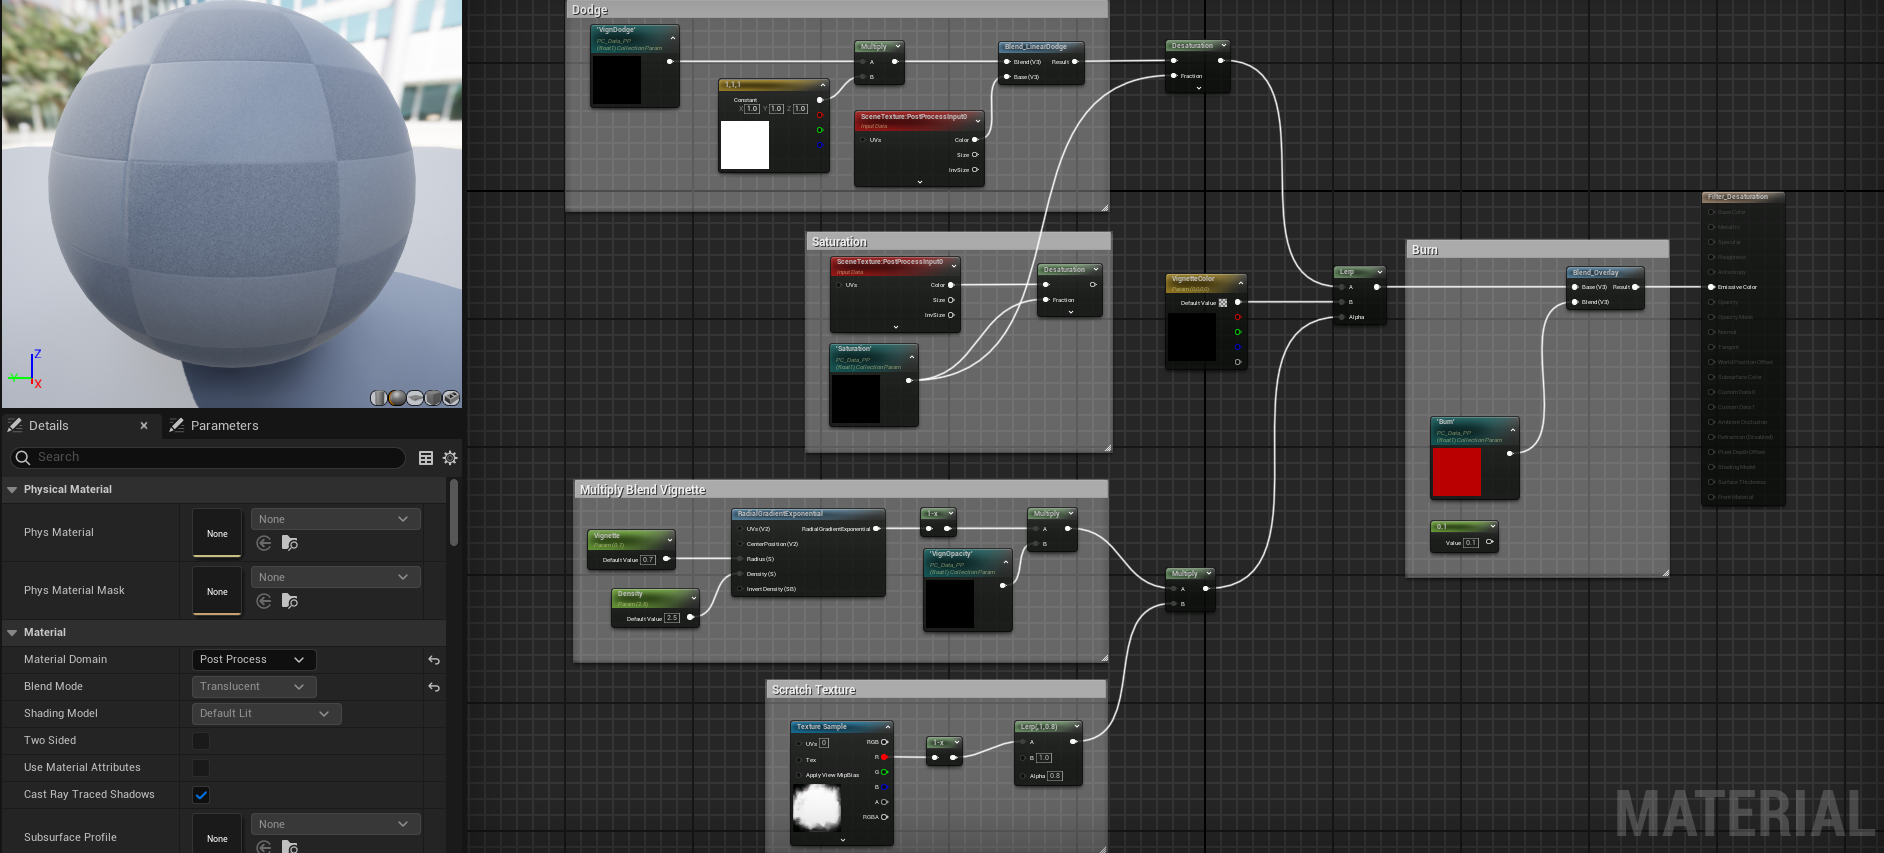
1.1 — Material set up for Saturation, Linear Dodge, Vignette, Burn, and Scratch texture

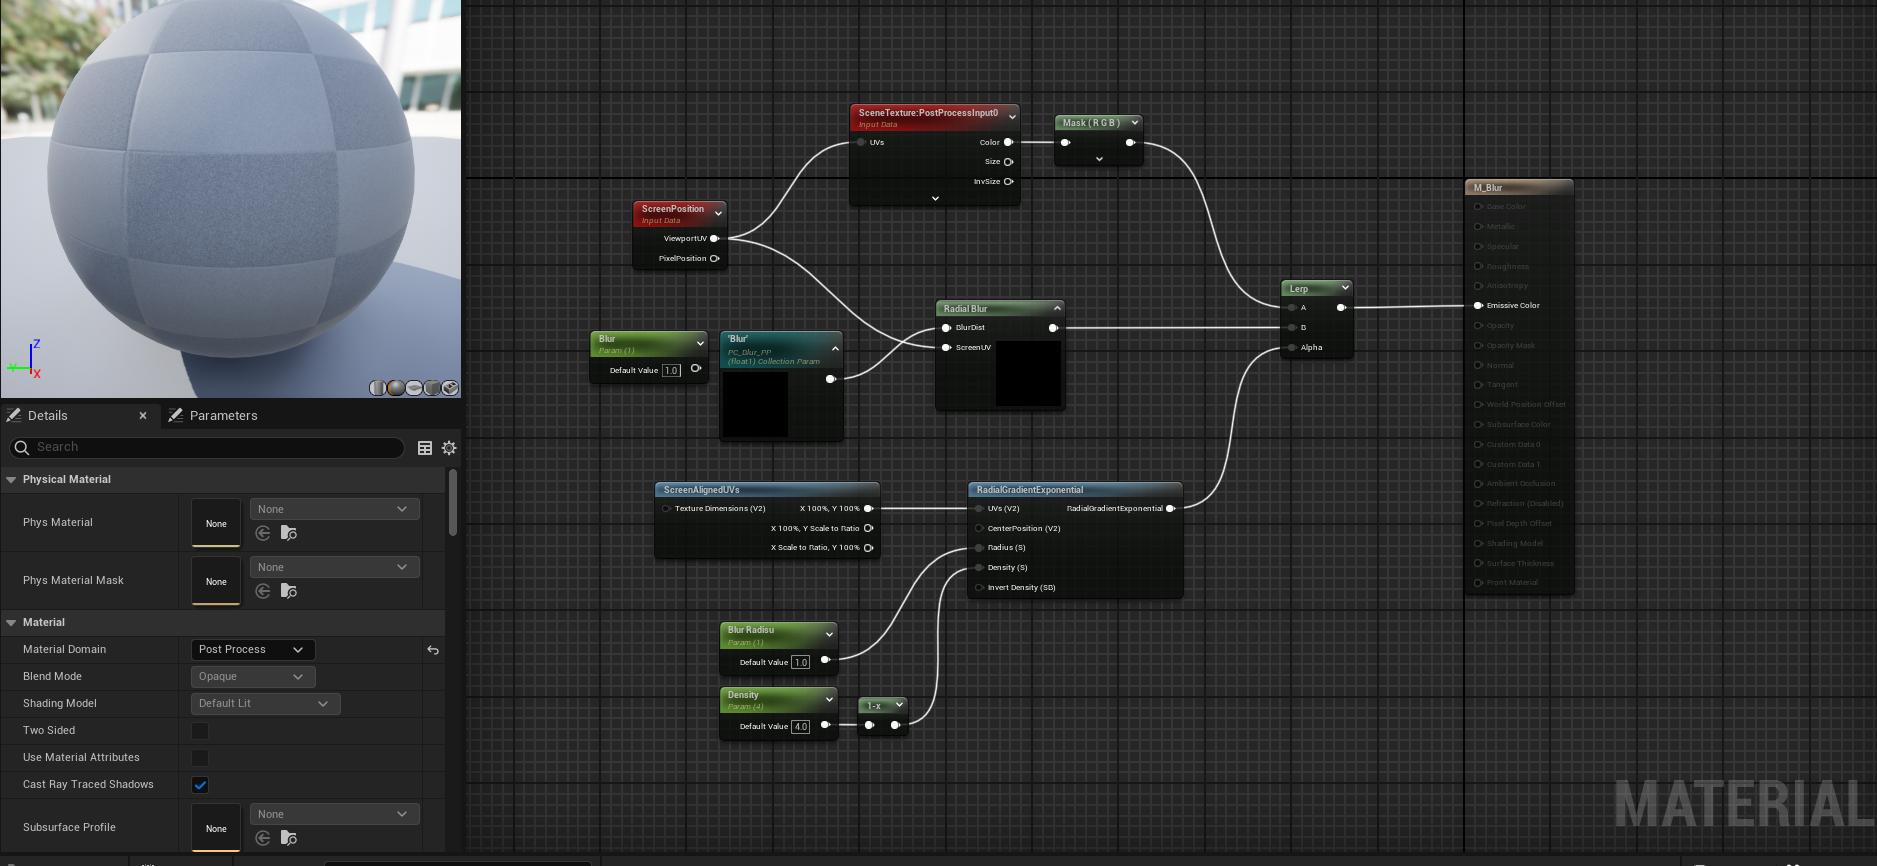
1.2 — Material set up for Blur

Since many resources didn't explain exactly what I needed to create, much of it was gathering relevant information, pieced from different links, and trying to applying it to this project. So, much of these nodes picked were through trial and error. Also scouring through the Unreal Documentation to gain a better understanding of what each node does helped as well. 

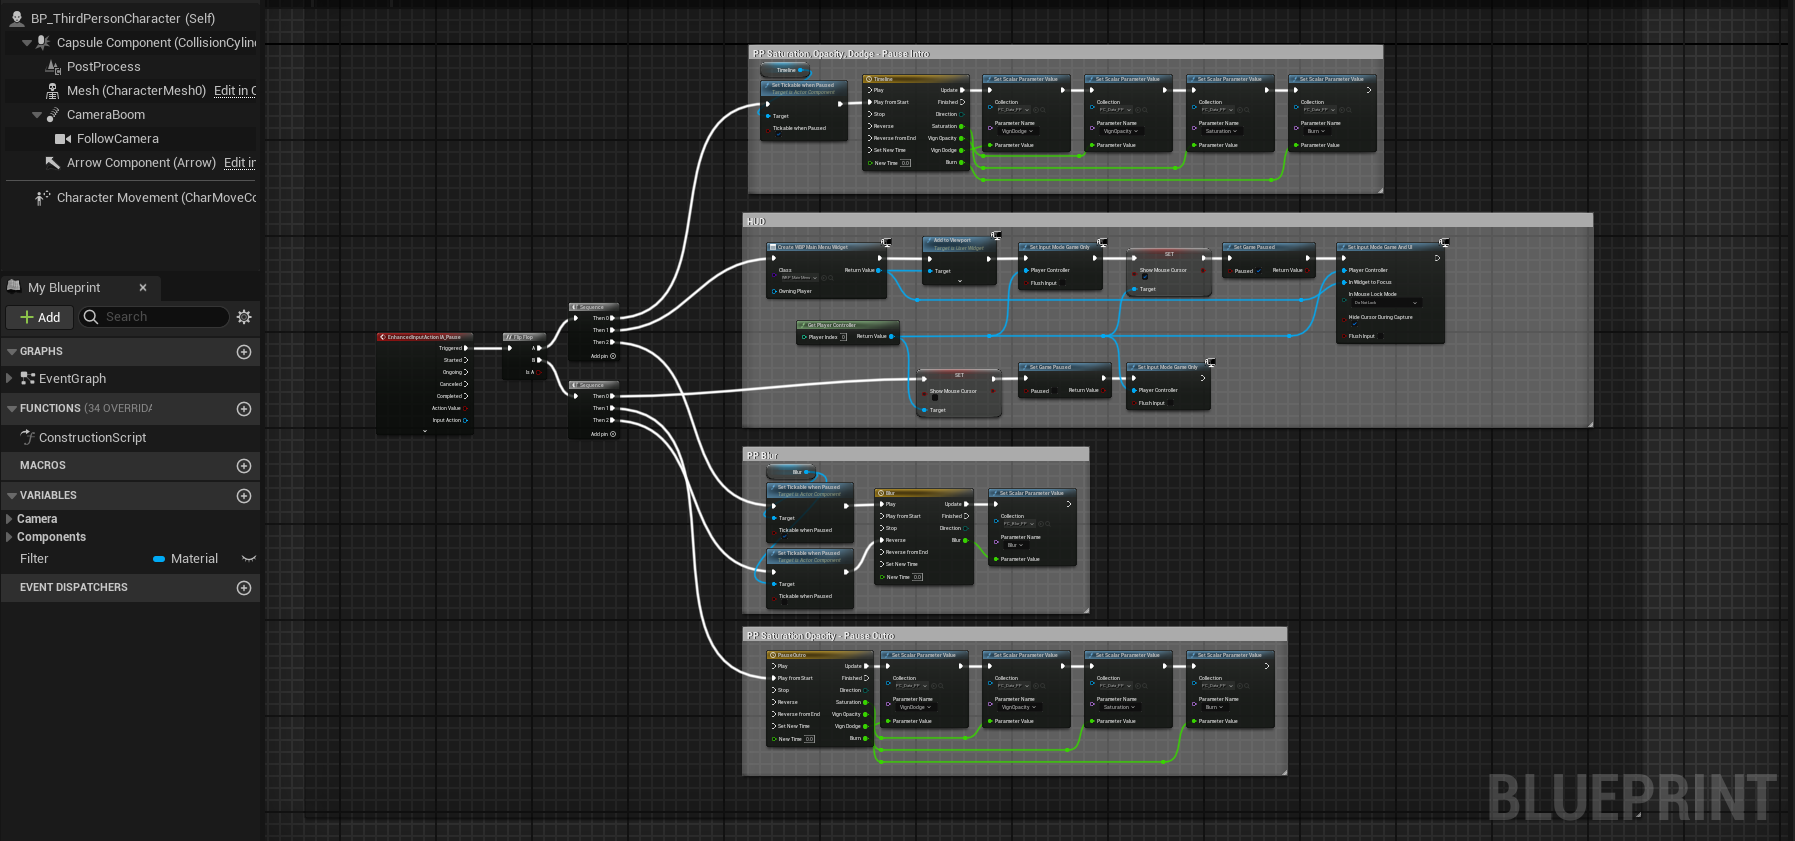
1.3 — Materials and UI WBP set in the Third Person Character Blueprint

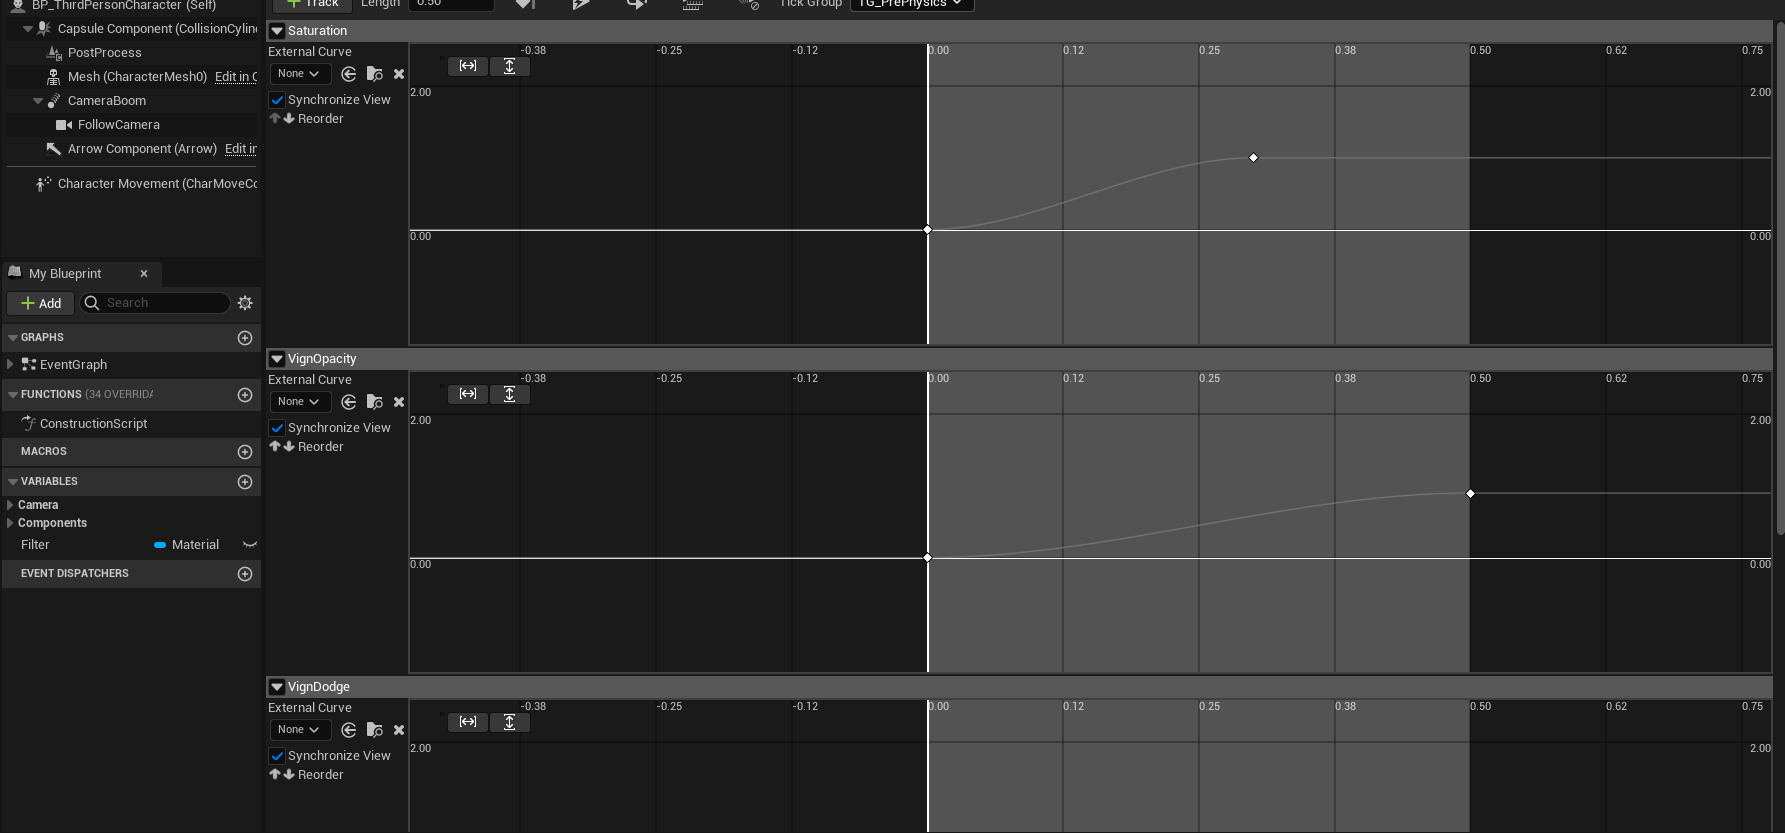
1.4 — Example of a Timeline Node for Saturation, Dodge, etc.

With the materials created, I moved onto connecting it with the Third Person Character and mapping the keyboard function to animate on screen. In order to animate, I needed to set up a Collection Parameter for each sub-task within the materials (1.1 and 1.2). By doing so, I was able to use a Set Scalar Parameter Value, connecting each Parameter value to the corresponding Timeline Node that housed the animation timeline (1.3 and 1.4). 
Since these animations were meant to play after the game was paused, a Set Tickable when Paused node was necessary for each parameter. Connecting these to a Sequence to fire off all "layers" simultaneously, then to a Flip Flop to allow the same keyboard mapping to pause/unpause gameplay, and finally connect it all to a EnhancedInputAction that maps to a specific button on the keyboard (In this project case, the "P" key). 
Task 2 | The Alpha Mask 
With the first phase of the pause animation/transition out of the way, I moved onto setting up the widget blueprint for the main menu. With this task, came another set of sub-tasks to tackle:  
2.a. — Texture creation
2.b. — Material alpha mask
2.c. — Create Main Menu WBP
2.d. — Animate Mask in WBP
2.e. — Connect UI WBP to TPC WBP 

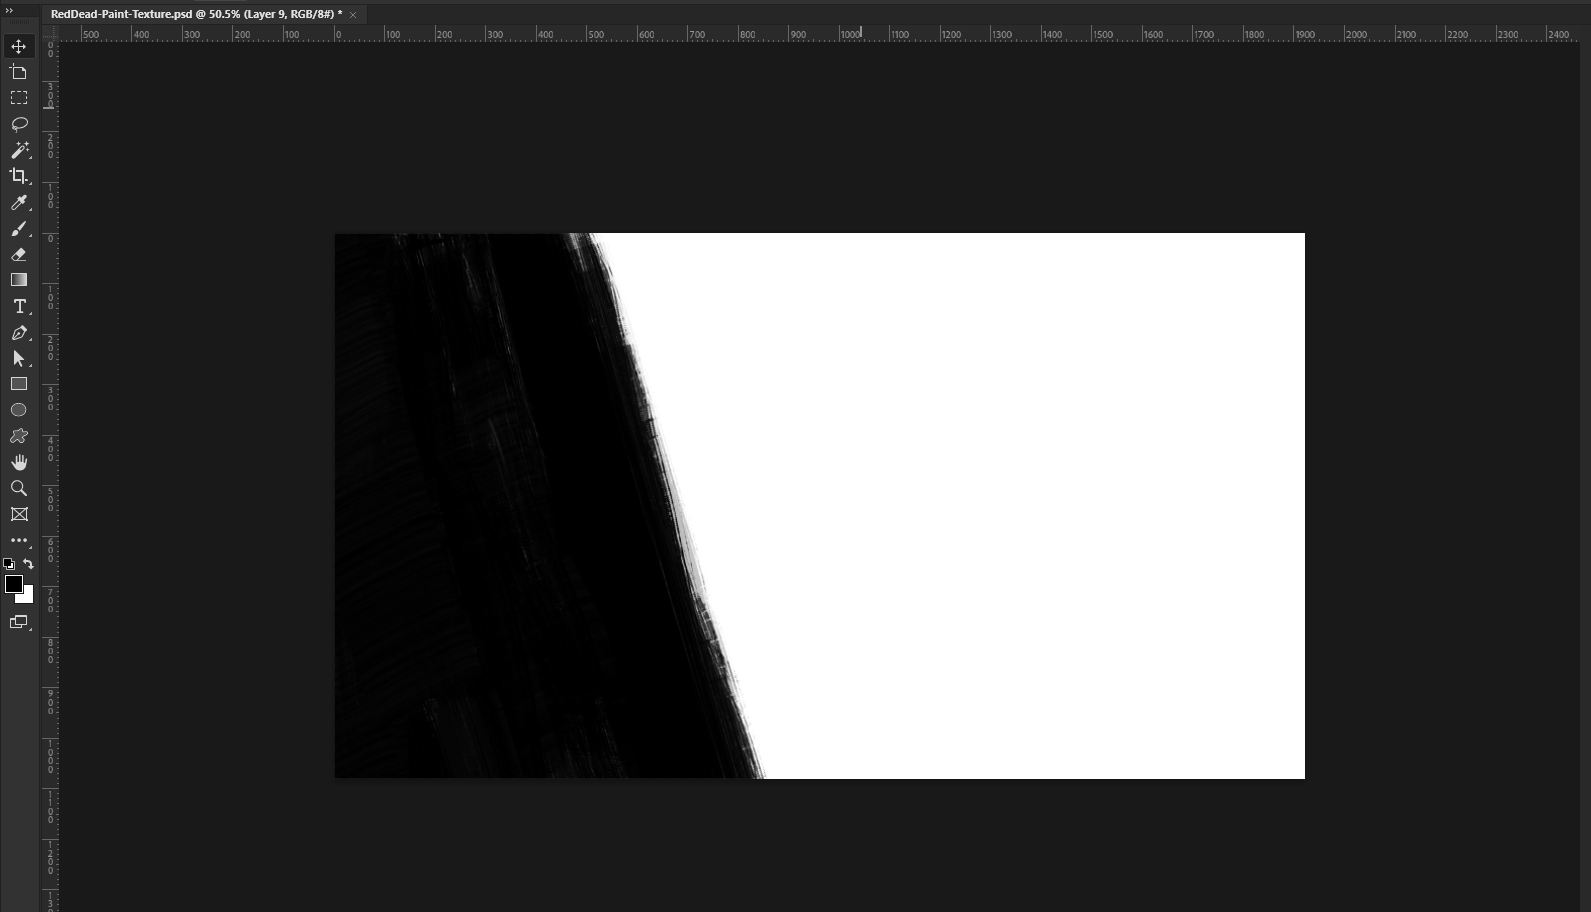
2.1 — Used textured brushes to create a similar "paint" mask

Because of how familiar I am with Photoshop, I wanted to spend as little time as possible in that program. Knowing how little I know Unreal, it was important I jump back into UE so as to keep the project momentum moving forward. BUT, because of this, I skimmed over learning proper texture formatting and the do's/don'ts when it comes to implementing textures to the engine. For a personal project, it's okay but I also don't want to continue bad practice. It's one of the learnings I need to set time for.

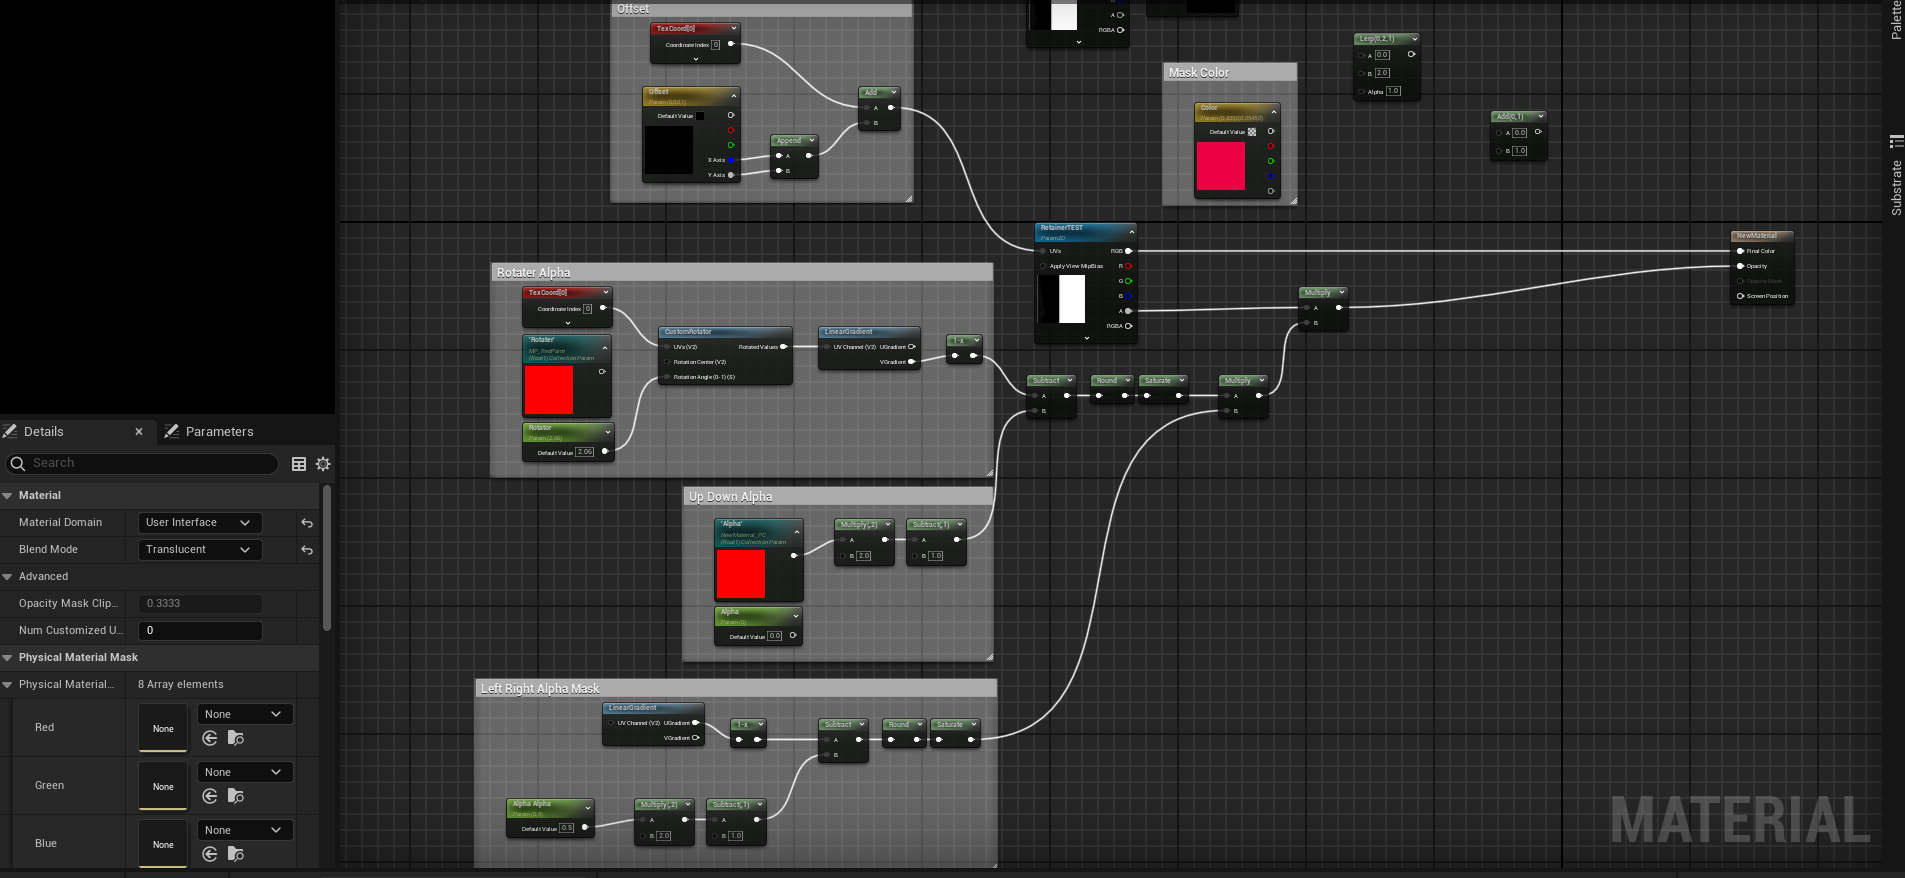
2.2 — Inside the Alpha Mask UI Material 

For setting up the material alpha mask, I became somewhat familiar with the process from when I created the post process material for the blur, dodge, etc. Only this time (after learning how I was going to animate it), I needed to make sure I had the Material Domain set to User Interface since this will be connecting to the UI WBP. Through trial/error, and following a YouTube video (link), I was able to achieve the alpha mask result and get it ready for animating.
I won't go into detail about creating the Main Menu WBP but shoutout to Yukiya 雪也 in the We Can Fix It In UI discord for sharing the information about Retainer Boxes and Materials (link). After discovering that I can connect a material with a retainer box, I utilized another video (link) by Mathew Wadstein to help me finish this sub-task. 

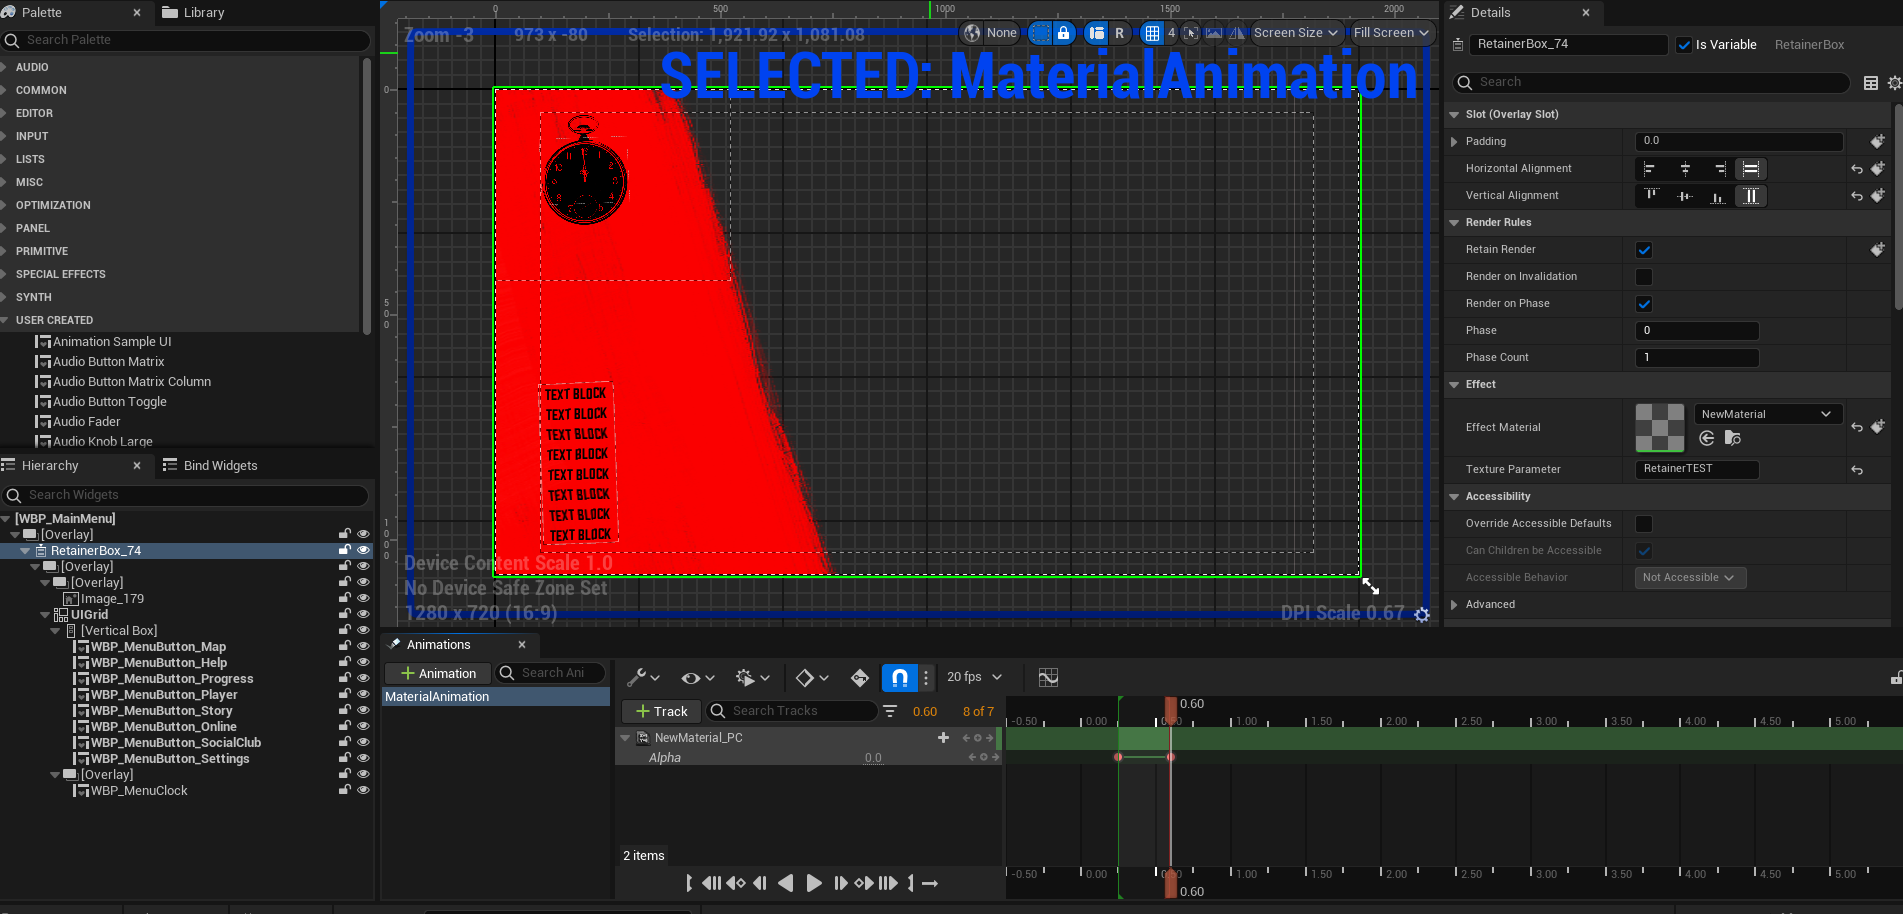
2.3 —  RetainerBox with Effect Material connecting the Alpha mask to create an animation

Using a similar approach to the other material tasks from before, to animate this UI material, I first connected a Texture Parameter labeled 'RetainerTEST' (2.2) to the widget blueprints retainer box under Effect Material. In order for this to work, the Texture Parameter had to match same name given to the material's texture parameter. With the material and WBP working together, an animation track was created, setting keyframes based on the parameter (2.3). 

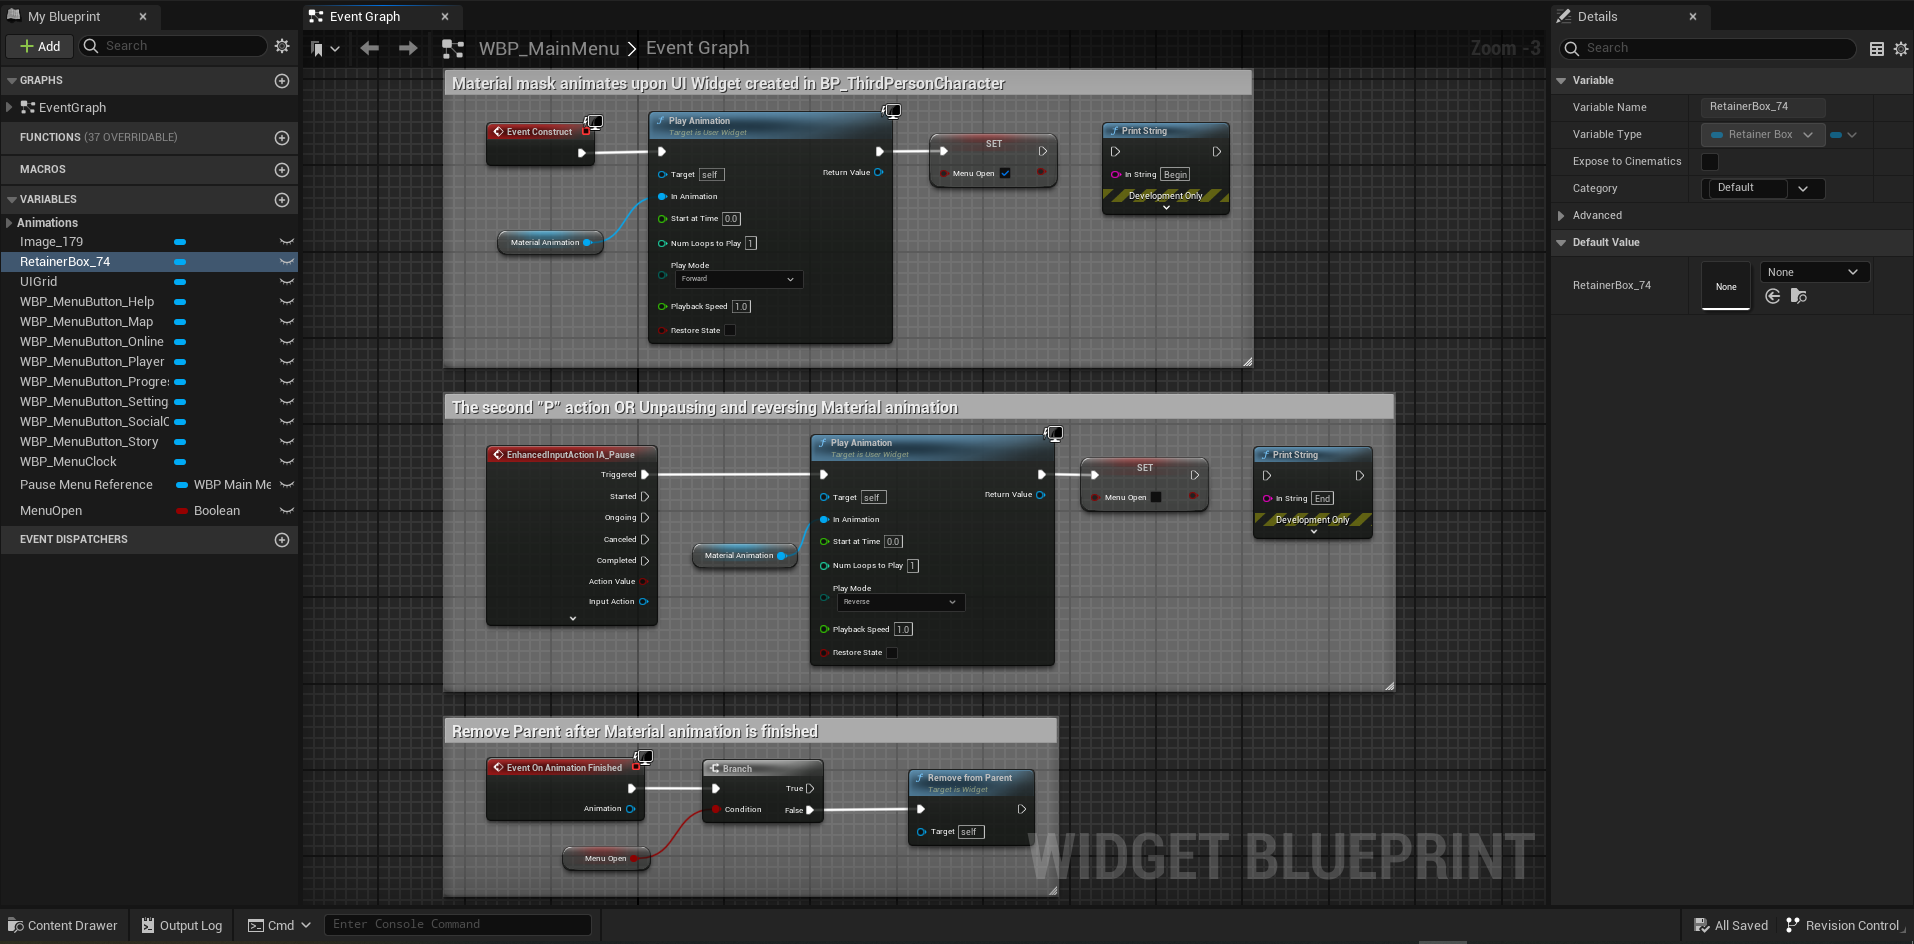
2.4 — Applying the Remove from Parent after the mask animation has been completed in reverse (unpause)

Connecting the UI WBP to the Third Person Character BP follows standard practices which can be viewed on 1.3 above. I think the key component that allowed me to animate the alpha mask in AND out was using an Event on Animation Finished event node. Without this node and executing a Remove from Parent off of it, the animation outro (reverse) would not work (see 2.4). Following a similar approach to this video (link) helped me achieve the final result. 
Task 3 | Buttons and Clock 
The final piece to this puzzle; the buttons and clock function. And once again, breaking it down into key components helped me bring it all together:
3.a. — Modular Button(s)
3.b. — Random Integer in Range
3.c. — Crafting the Pocket Watch
3.d. — Using data to mimic real world time

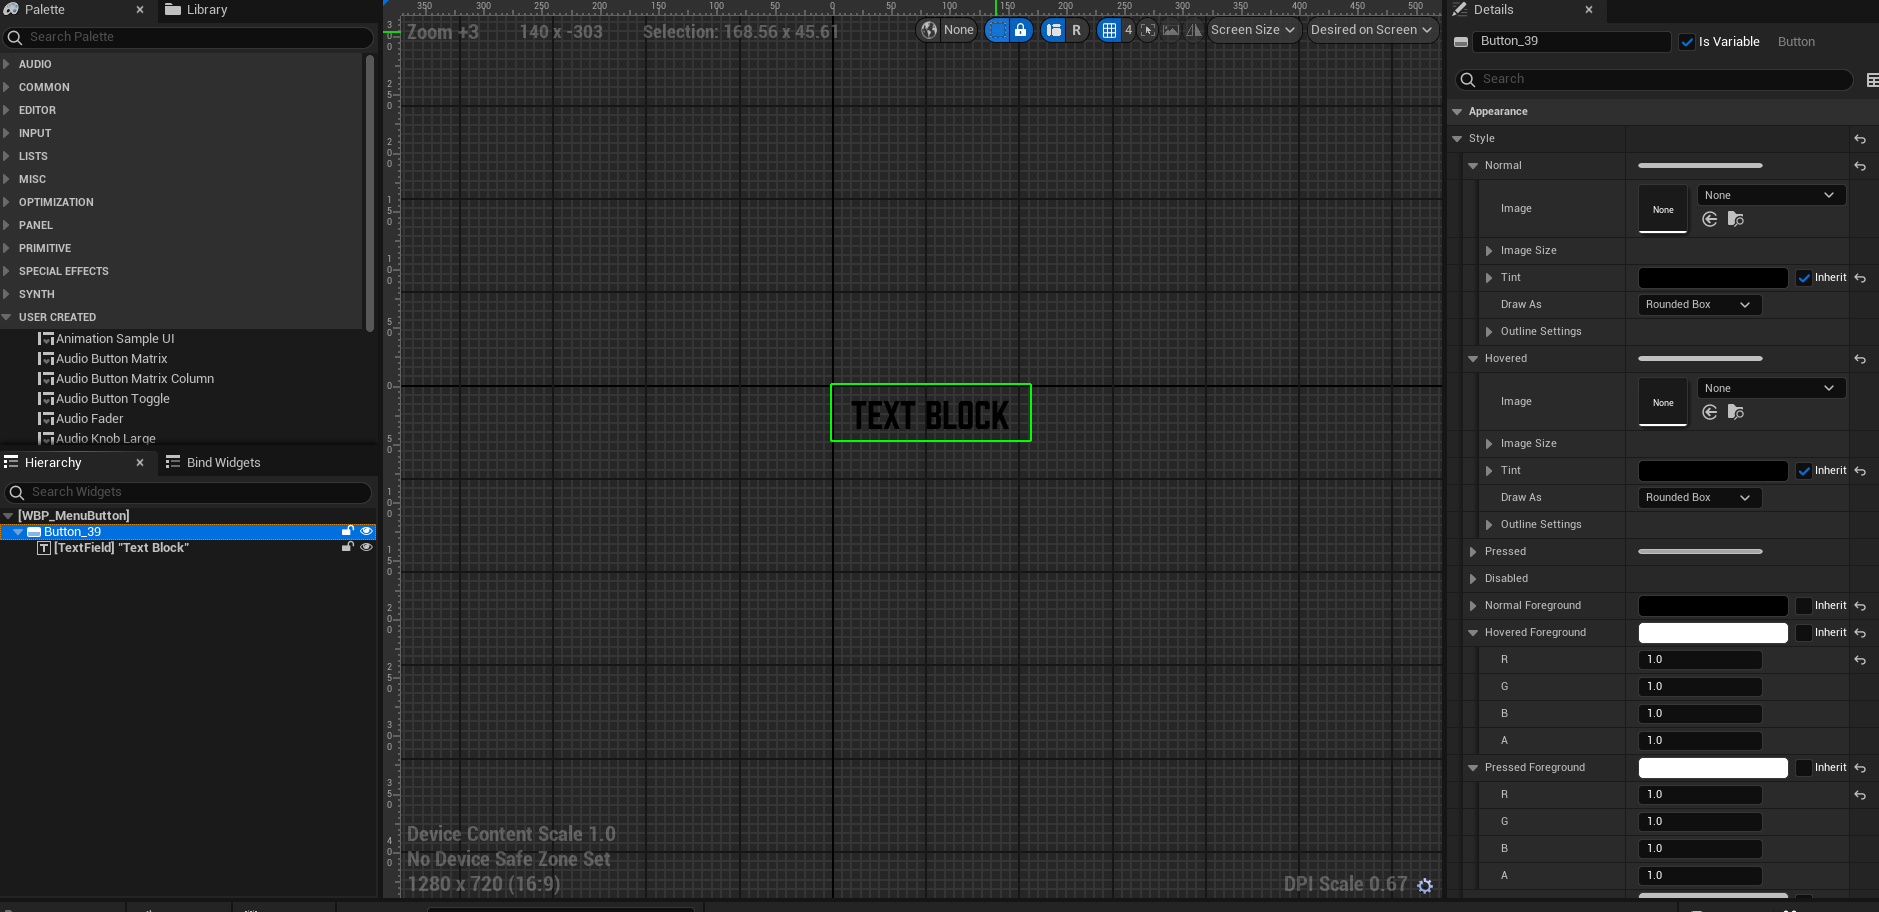
3.1 — Setting up a modular button

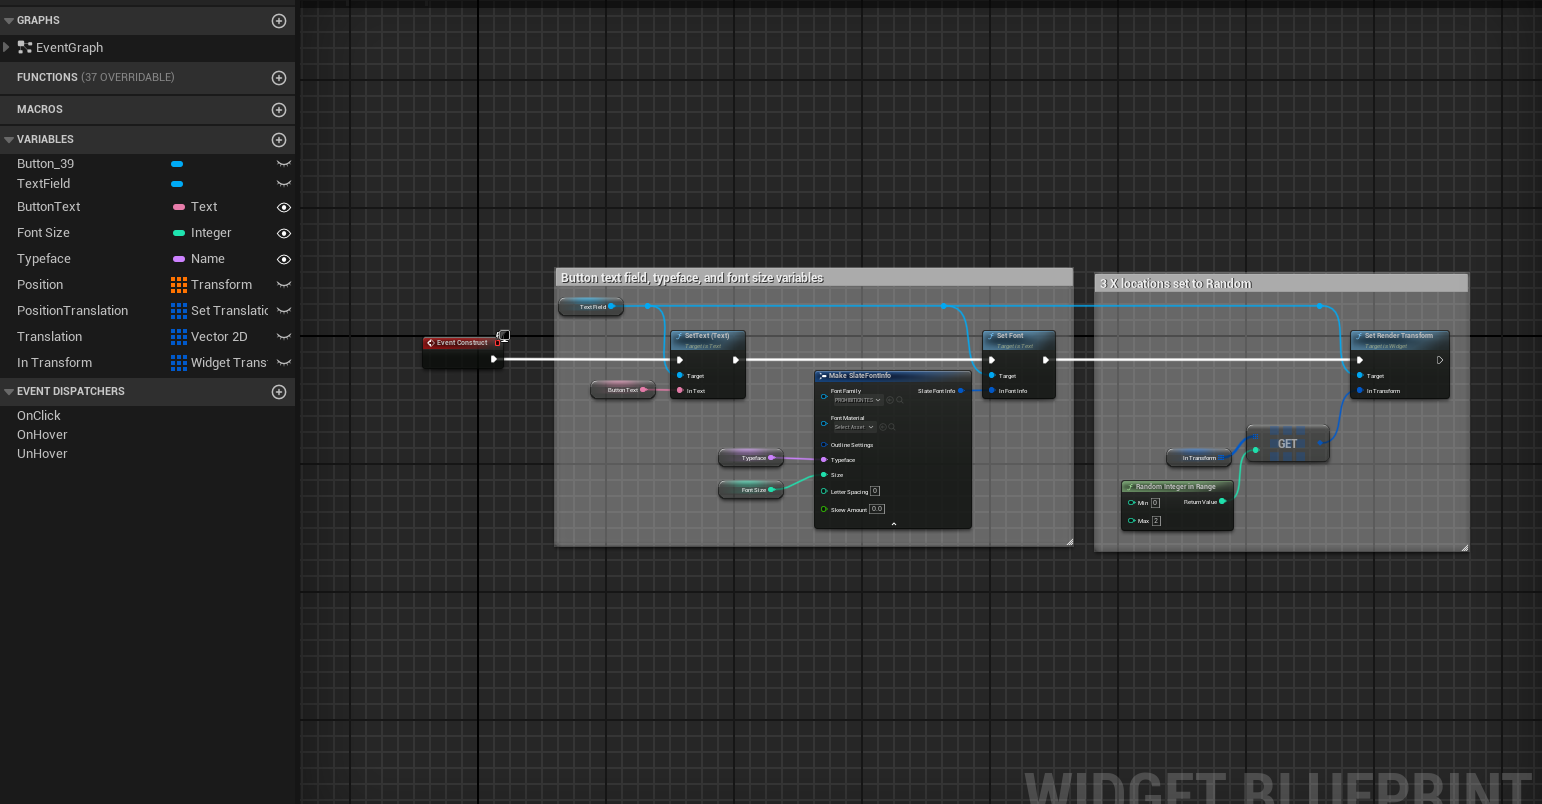
3.2 — Modular button's Event Graph

To keep things simple (and because each menu button used the same default/hover effect), I kept the button modular; creating one single button and adding variables to allow edits to text fields, text size, etc. and knowing a simple location animation will need to be applied to each button.  Utilizing a modular widget video (link), I was able to achieve a basic modular button which was then duplicated for each sub-menu screen.
When testing Red Dead Redemption II's pause menu, each time the pause button is pressed, there is a subtle change in the different menu screen buttons X location. To achieve this in Unreal, a Transform Array Variable was created, combining this with a Random Integer in Range math function (set from 0 - 2) into a Set Render Transform (see figure 3.2), I was able to achieve three different X locations for each button at random every time the pause button was pressed. 

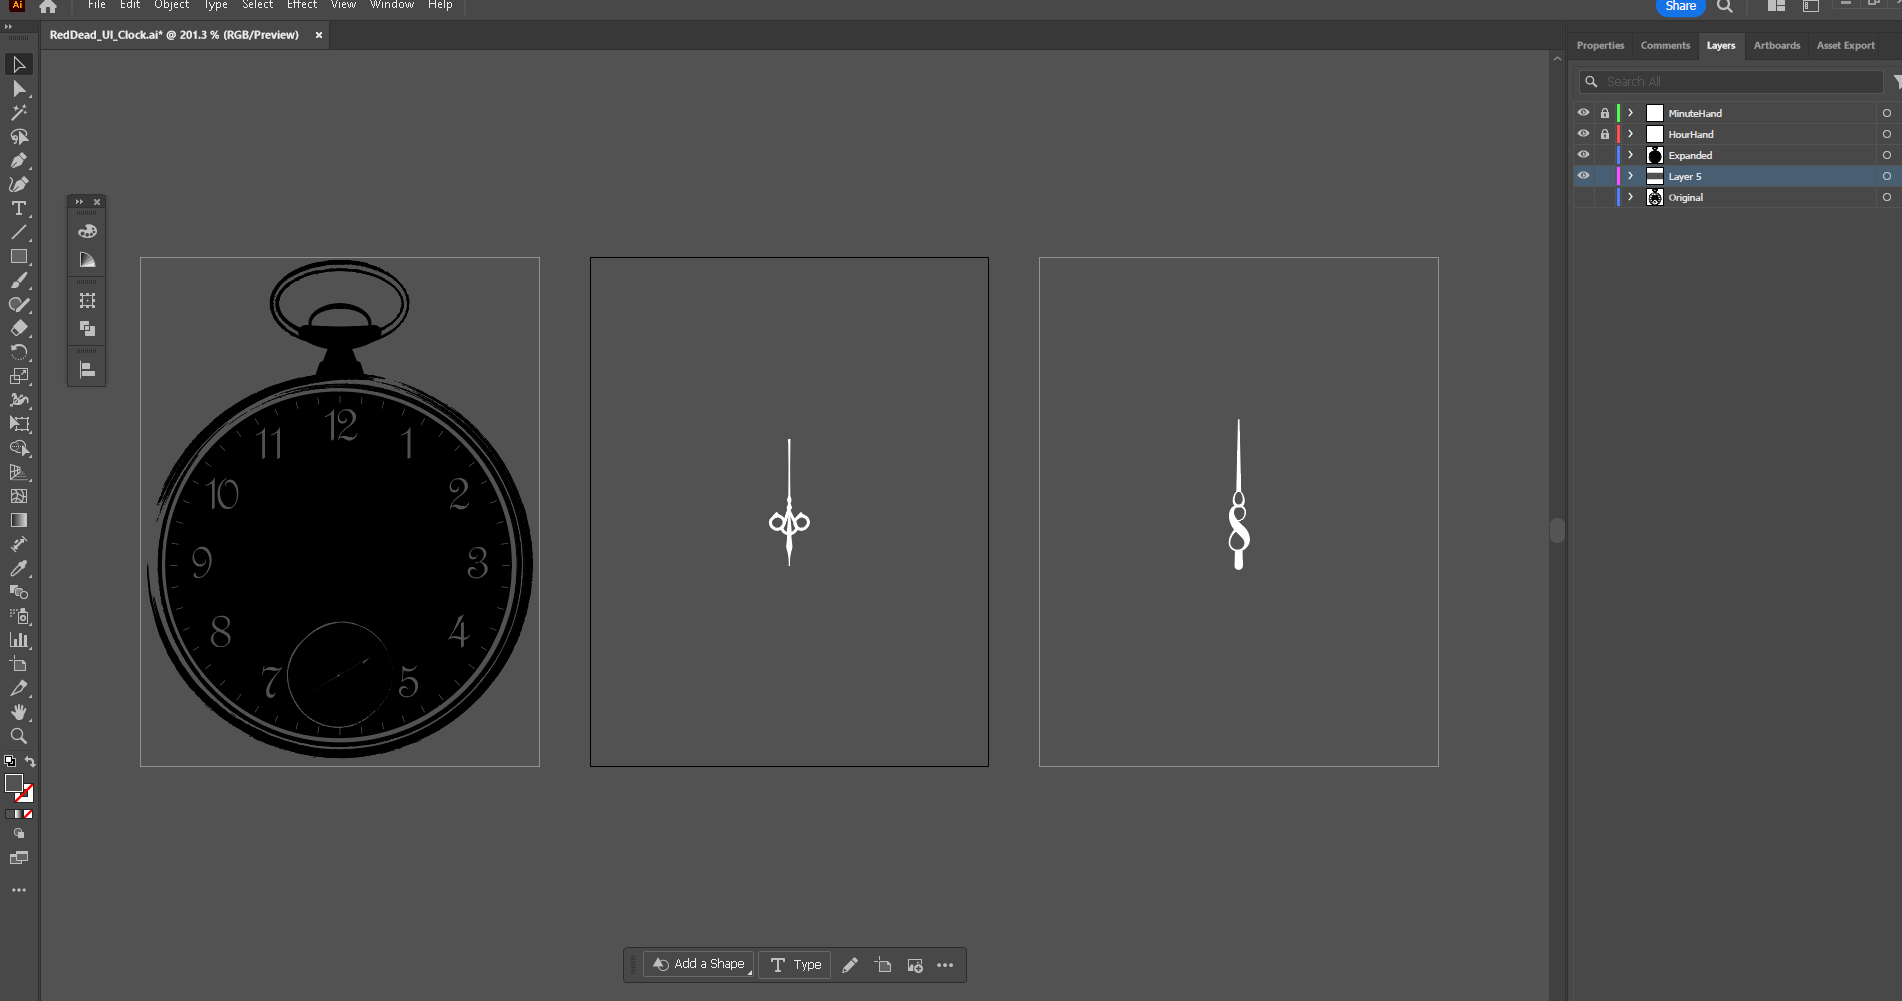
3.3 — Pocket watch was designed in Illustrator, separating clock hands to apply a real time data node to them in Unreal

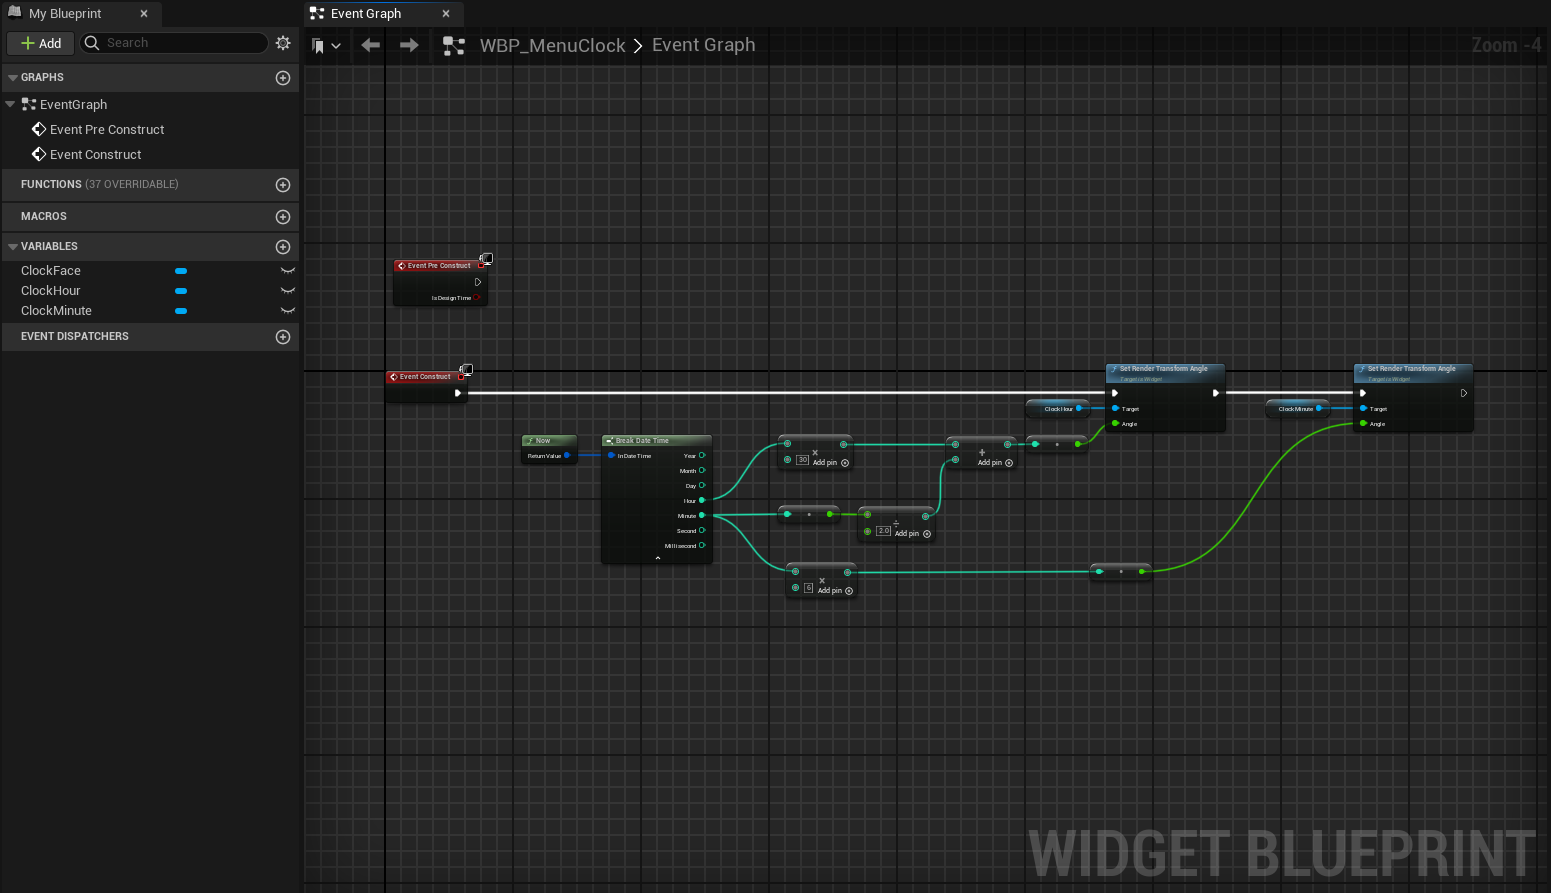
3.4 — Applying data logic to clock hands

The Pocket Watch was designed in Adobe Illustrator and additional texture masks were applied to the .png in Photoshop. In RDRII, the pocket watch graphic mimics in game time. To achieve a similar function in Unreal, I separated the pocket watch, the hour hand, and the minute hand into separate .pngs. 
To cut down on finding a solution that connects the hour/minute hand to an "in-game" clock, I simply used a local time Now and Break DateTime math function that allowed me to set the right increments for the hour/minute hand into a Set Render Transform Angle function (link).
With the clock working, adding it as a child of the Retainer Box inside the Main Menu WBP, pressing the pause key, and the final outcome is a working pocket watch graphic that is connected to my local time each time the pause button is pressed.
Final takeaways
Prior to diving into this project, I knew very little about Unreal Engine. I began learning Unreal in January of 2024 using purchased Udemy courses that talked about basic blueprint scripting. When I felt some confidence with the engine I decided to venture away from the tutorial trap and tried recreating an existing game menu (this project). To stay motivated and determined to get to a finishing point, I chose a game that I loved and something I felt I could tackle. 
Given the time frame and wanting to finish something, there were some cut corners during my process. For the things I need to change and apply to in my next project:
1. Learn more about textures and what's needed for proper optimization
2. NAME YOUR LAYERS — this comes as a no-brainer when working with a team but definitely fell flat in this personal project as I was learning a lot of new things
3. Continue learning about Materials and blueprint scripting
Overall, I'm happy with the outcome and I feel like I learned more with this project than following any tutorial prior. I encourage anyone who is learning to do the same! If you've made it this far, thank you! And if you wish to comment on any of the material written, whether that be constructive or just to chat, feel free to message me on Twitter or LinkedIn
Happy learning!
Videos and readings that helped me get through this project:
Let's Build the RPG! - 43 – Post Process Material Damage Indicator Effects on Screen – UE5 Tutorial by NumenBrothers
Six Post-Postprocess Effects - UE4 Tutorial by UnrealCG
Screen Transition Effects Using Postprocess Material - [UE4] by UnrealCG (Understanding Collection Parameters and the Timeline Node)
Unreal Engine 5 Beginner Materials Tutorial - Learn to Create Materials from Scratch! by UNF Games (very useful for me in first understanding material nodes)
WTF Is? Material - Multiply in Unreal Engine 4 by Mathew Wadstein Tutorials (Mathew has a ton of great video resources that I constantly went back to)
2D Tech Art Chronicles: Lerp by Adrienne Pugh/joyrok (great articles on understanding Lerps) 
Unreal Engine 5 - Ghost World Postprocess Effect by UnrealCG
[UMG] About RetainerBox, which also has dissolve effects — Shoutout to Yukiya on the WCFIUI discord for sharing this link with me
WTF Is? UMG: Retainer Box in Unreal Engine 4 ( UE4 ) by Mathew Wadstein Tutorials
Unreal Engine 4: How to Reverse An Animation on Closing Widget by A Quest for Awesome
How to make Modular Widgets/UI | Base/Parent Widgets | Unreal Engine 5 Tutorial by Kekdot
How To Create An Analogue Clock | Displaying Real Time Or Custom Time - Unreal Engine Tutorial by Matt Aspland

                   ​​​​​​​
Back to Top